User Interface
Marlin Oyster is an off-chain compute marketplace that allows backends and asynchronous workloads to be deployed on a decentralized node network secured by enclaves.
Web 3 projects whose functionality requires server-level operations to complement/supplement their on-chain activities can leverage Oyster as a means to further decentralize infrastructure thereby eliminating single points of failure. Servers can be provisioned using smart contract calls and paid using crypto to host ML tasks, backends, frontends, MEV bots, RPCs and gateways.
In this guide, we’ll be taking you through the steps on:
- How Web 3 projects can use Oyster’s user interface to deploy any off-chain compute to a decentralized node network.
- How to participate as an infrastructure provider in the Oyster network.
Prerequisites:
- For users: You need to have already built and hosted your enclave image URL. Steps are available in our documentation.
- For Infra providers: Run a control plane to automatically manage infra for Oyster enclaves. Documentation and steps can be found here.
For support and guidance, please reach out on Discord. With that out of the way, let’s get started.
Understanding Oyster’s user interface
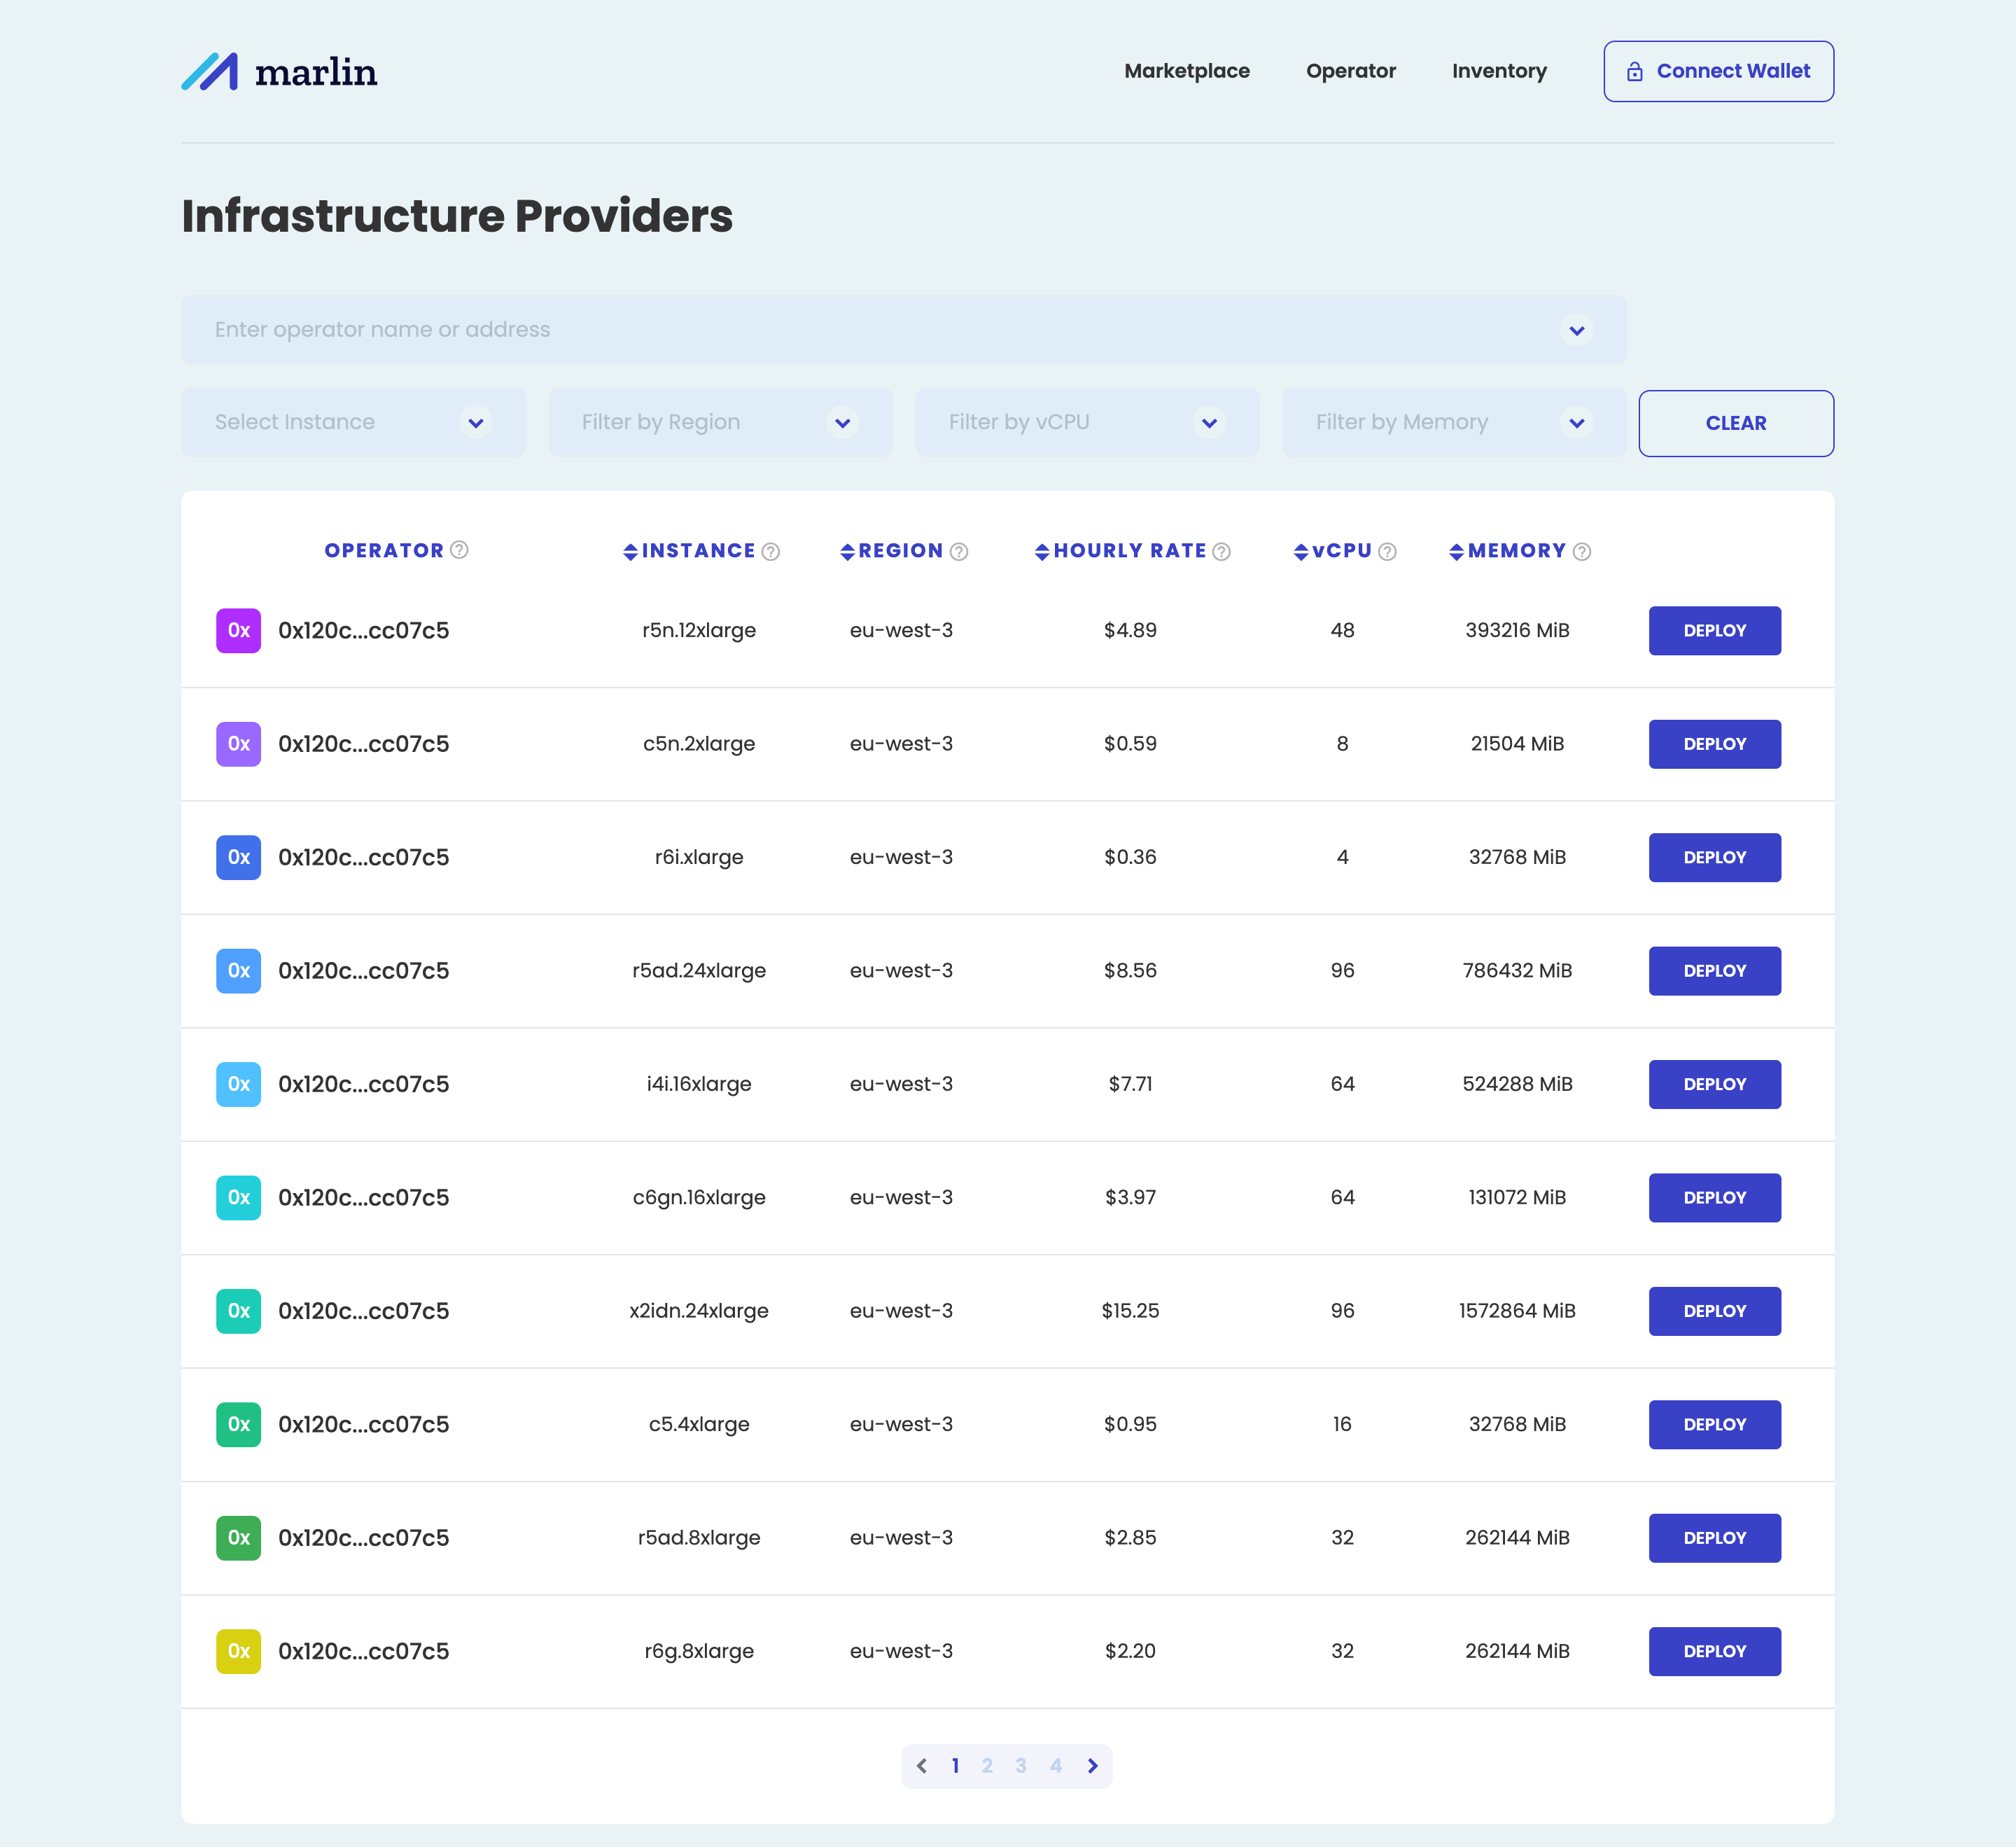
The Marketplace
Link: https://arb1.marlin.org/oyster/marketplace
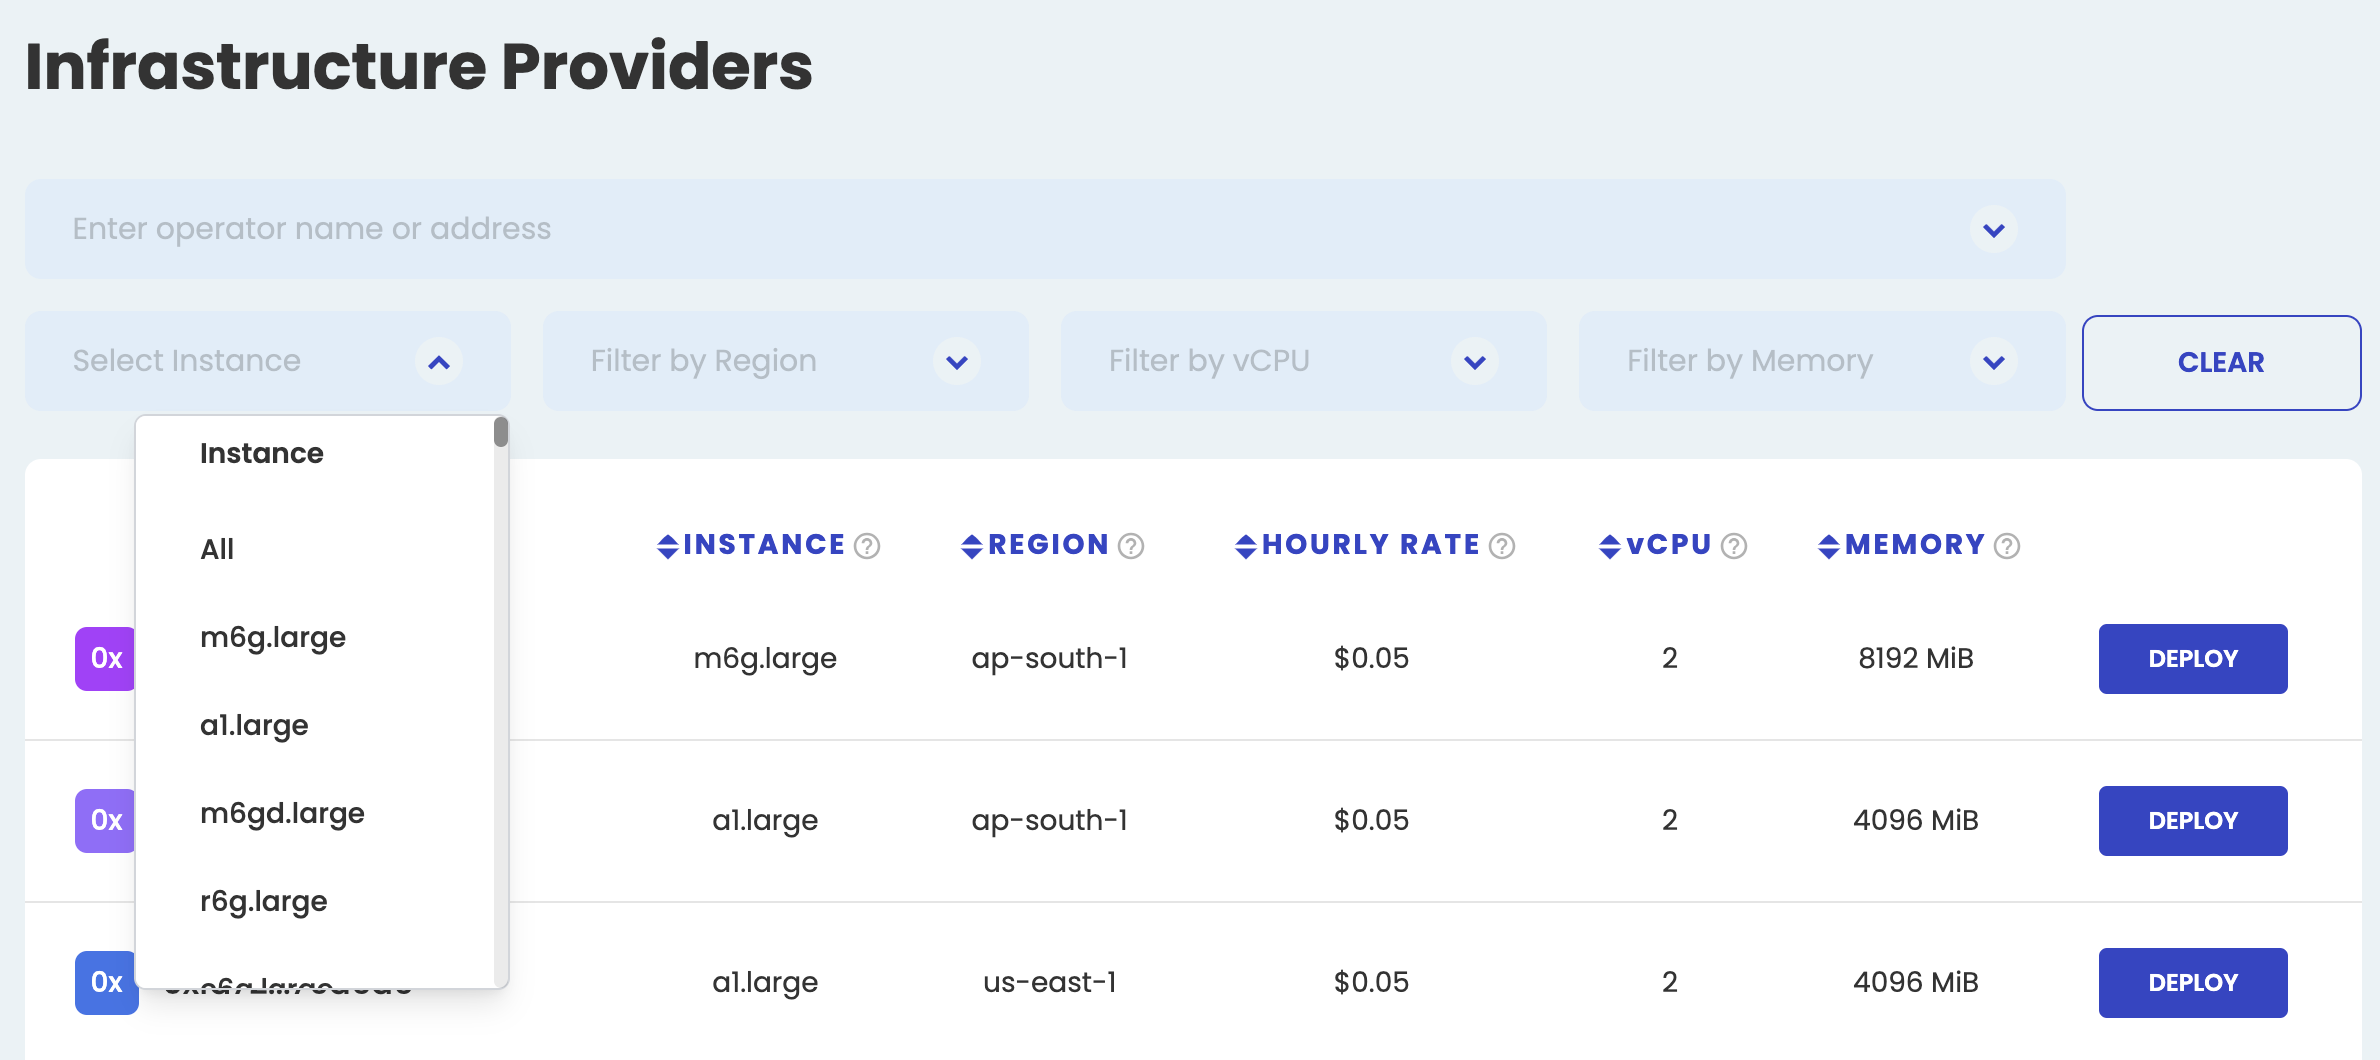
The marketplace provides users with a list of infrastructure providers and the various resources they offer to the Oyster network. Using the filters, developers can narrow down specific requirements with their corresponding costs and select a server of their choice.
All instances in the list support enclaves, meaning that the infra provider cannot tamper with the deployed code. Learn more about secure enclaves here.
Operators
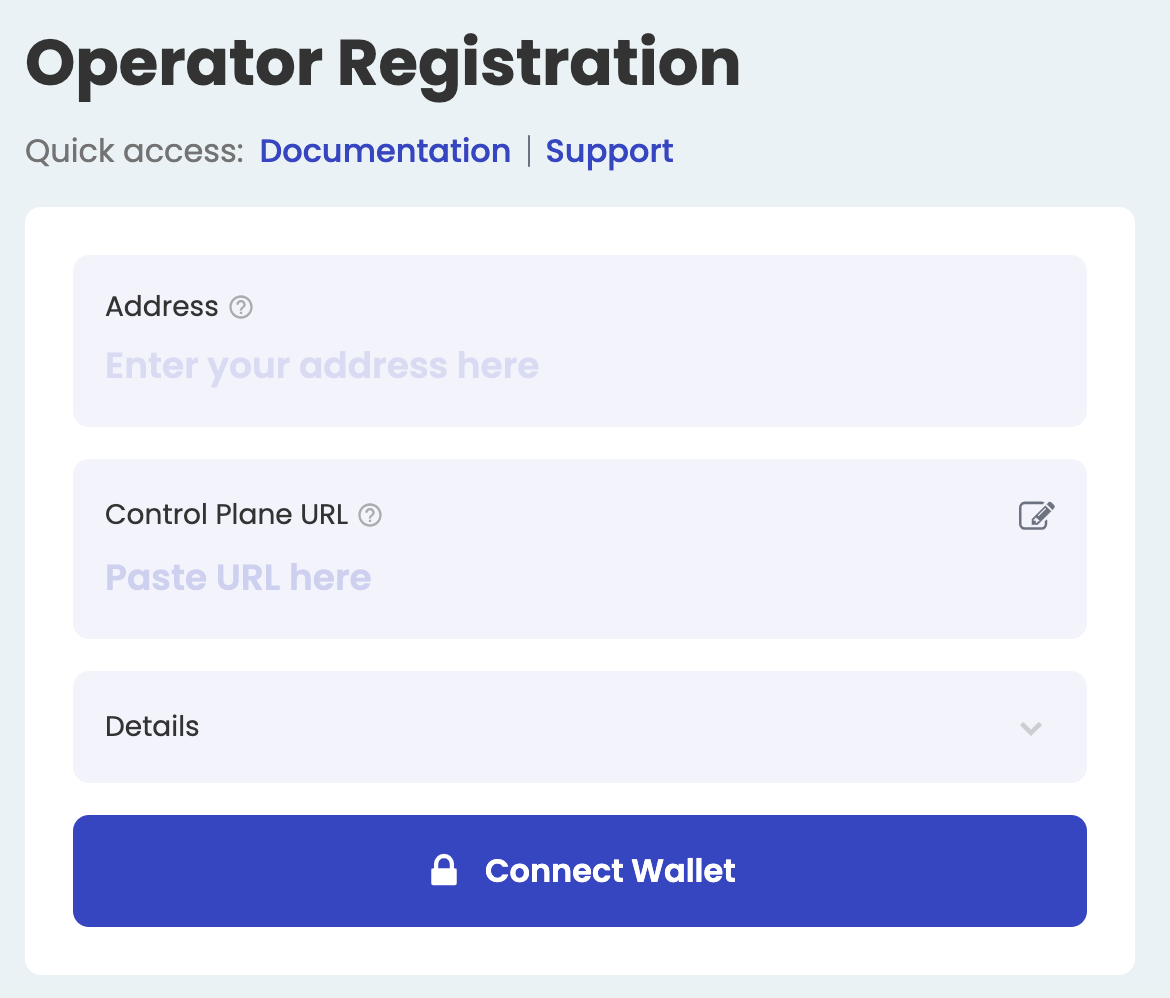
The operator page is for infrastructure providers who wish to offer their resources to users of the Oyster network. In order to become an operator, you need to install and set up a Control Plane to let users know your resource offering in the marketplace. To become an infrastructure provider on Oyster, follow the steps available in this guide.
Inventory
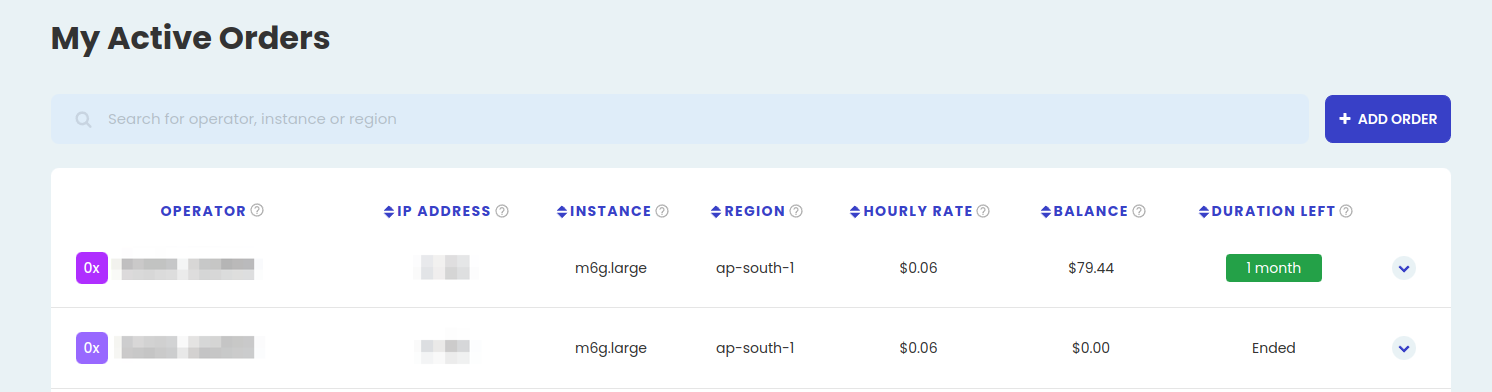
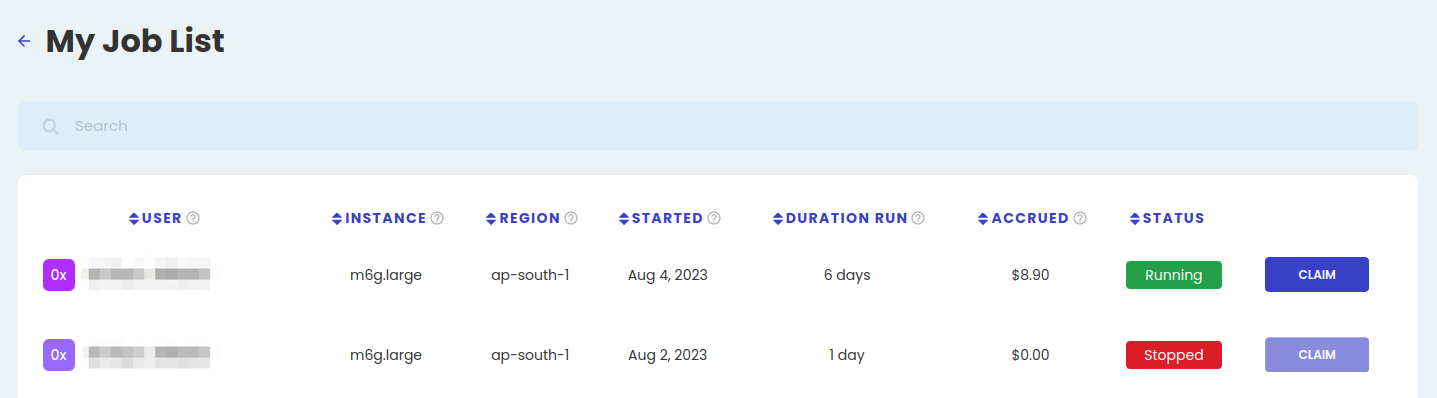
The inventory page shows the list of orders for a user who has deployed servers to a particular operator in the Oyster network.
Deploy on Oyster
Prerequisites
After building and hosting your enclave image URL (steps), go to the Oyster marketplace and connect your wallet.
Selecting an infra provider
Using the filters, narrow down the particular enclave instance, region and configurations that best suits your requirement. Once complete, click the deploy button on your preferred operator.
Creating an order
Upon clicking Deploy, users will be directed to a create order pop-up prefilled with their resource requirements. Entering the number of days the server needs to run along with the bandwidth will give users the total cost (in USDC). Paste the enclave image URL that you hosted earlier and approve the transaction. Once confirmed, click on the deploy button in the pop-up to complete the process. Your server should be up and running within approx 5-10 minutes.
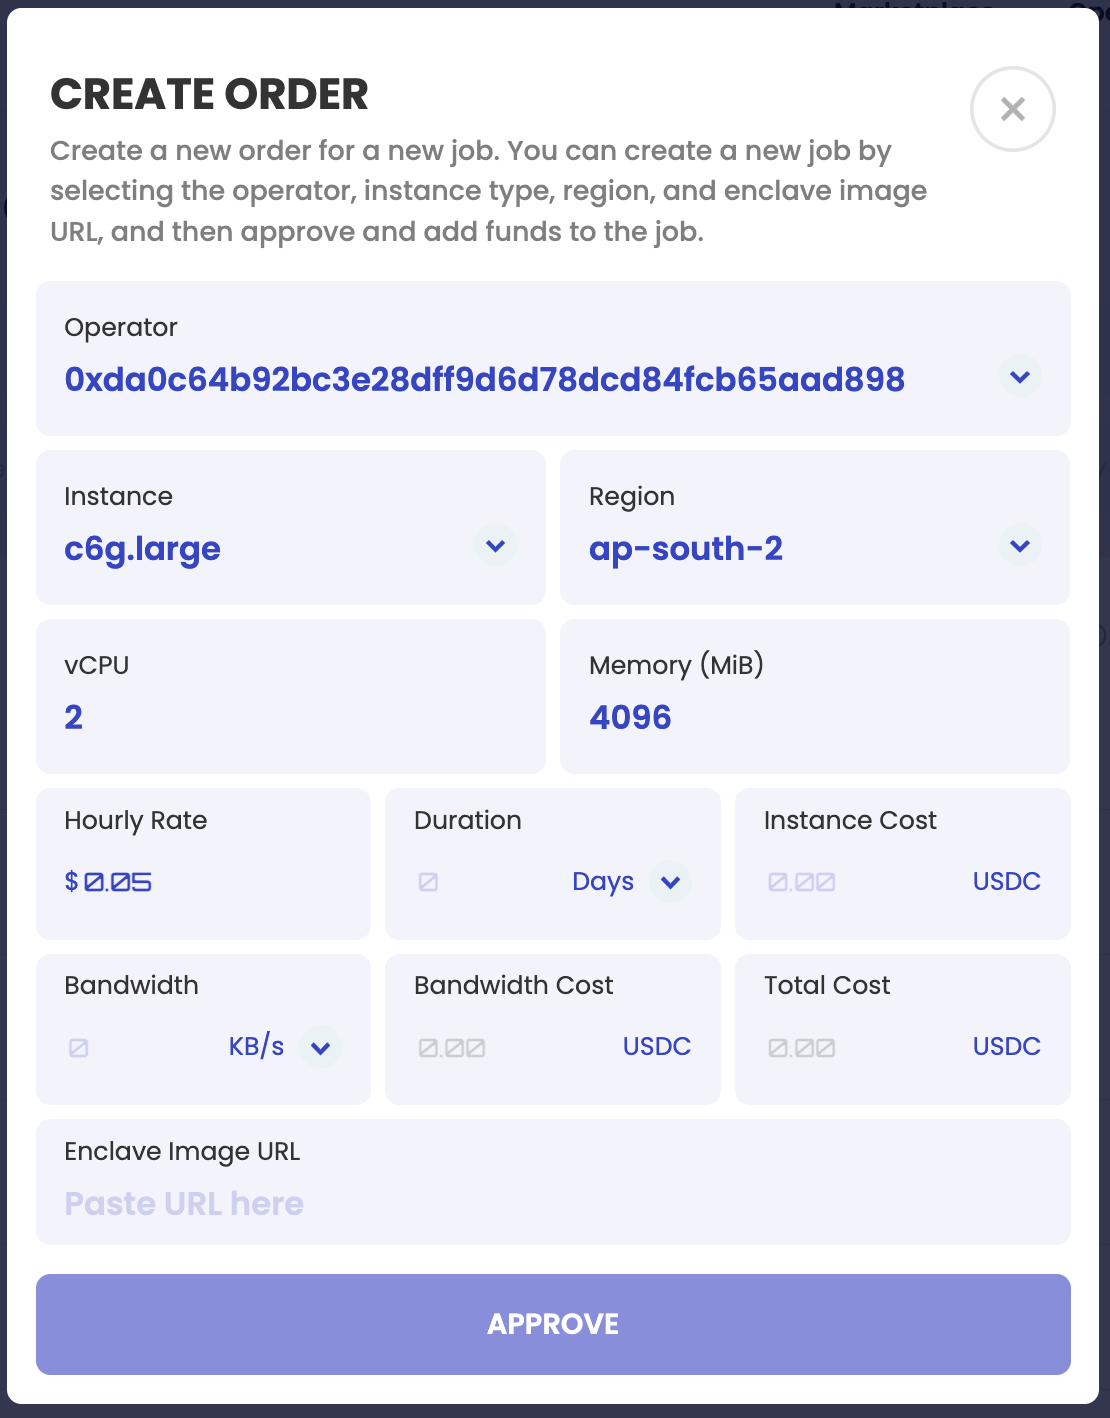
Note: Users aren’t restricted to one operator and can deploy their servers to multiple operators and manage them in one place.
Managing your servers
Users can monitor and manage their server on the inventory page after deployment. Clicking on the arrow icon at the extreme right provides the users with options to interact with their server.
Once a new enclave is deployed on Oyster, click on the refresh icon in the IP address column (after a few seconds) to get the latest IP address that represents the deployed enclave. This can be used to access your services setup within the enclave.
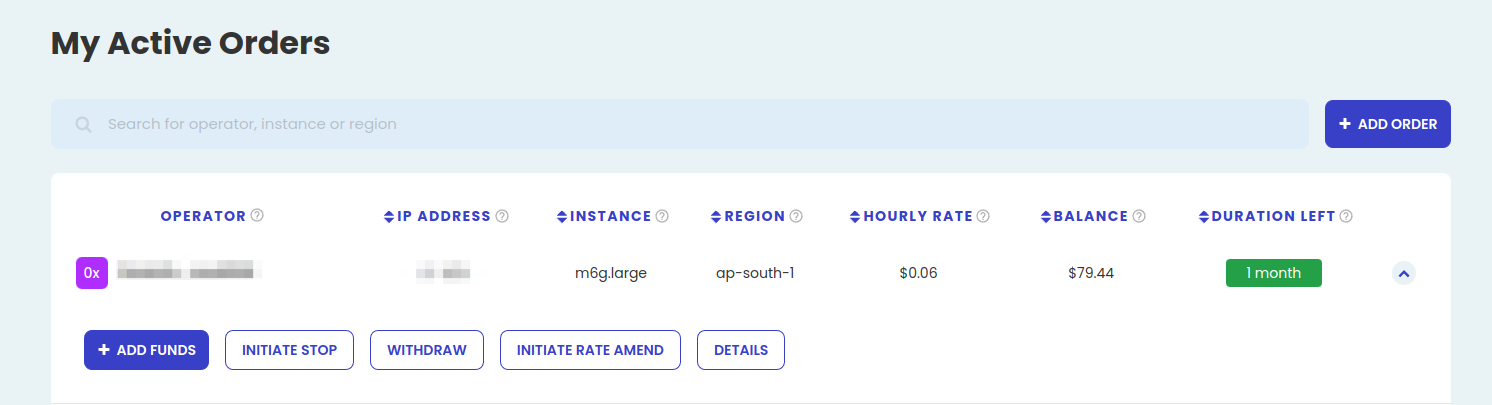
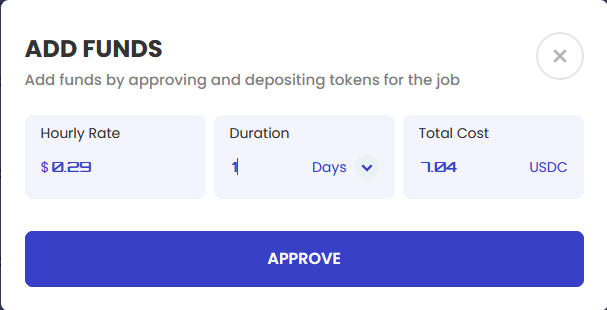
- Adding funds: Click on the Add Funds button to increase the number of days the server needs to be run by the particular operator. Once funds are added, the additional number of days would automatically be reflected in active orders page.
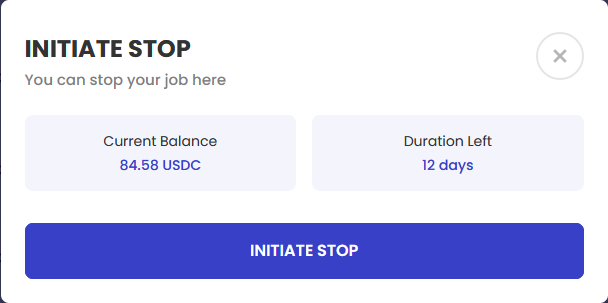
- Initiate stop: Stopping servers are a two step process. After initiating the stop, users need to wait for approximately 5 minutes and then click on the confirm stop button.
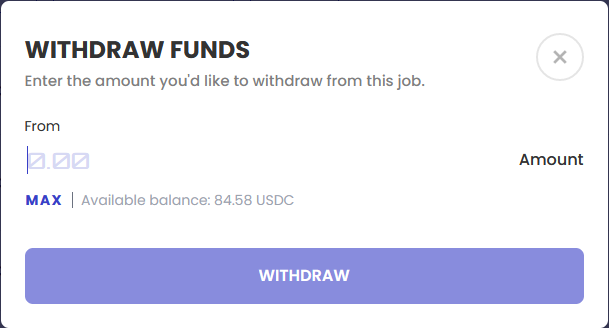
- Withdraw: Users pay operators by usage. Therefore, users can withdraw any excess funds from the Oyster platform by clicking on the withdraw button.
- Initiate Rate Amend: Users can change the hourly rate for the server by initiating and then confirming the rate amendment after a timer countdown of 5 minutes.
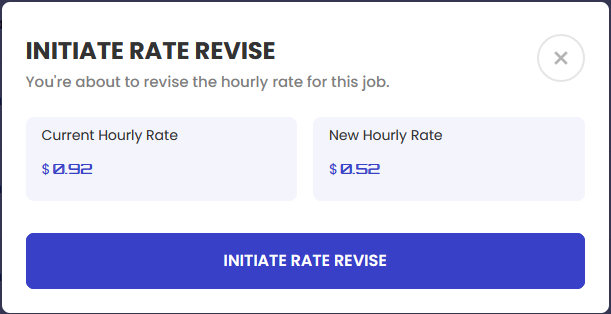
If the operator does not accept the new rate, the server will be stopped.
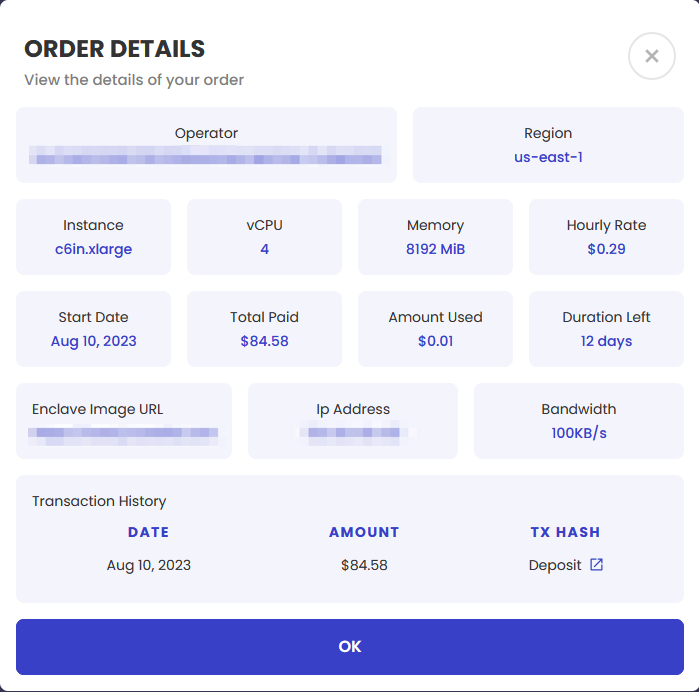
- Order Details: This button provides users with a summary of their server details at a glance.
Next, we’ll be taking you through the steps on how to become an operator on Oyster.
Running Infra for Oyster
Becoming an infrastructure provider in the Oyster network is permissionless. Operators looking to join the network need to run a control plane which automatically manages infra for Oyster enclaves and let users know their specific offerings displayed in the marketplace.
After running the control plane, operators need to register themselves on the Oyster platform by going to the operator page. After connecting the wallet and pasting the control plane URL, the details section should automatically populate with the operator’s resource offering. After verifying that the details are correct, click on the register button and complete the transaction.
Monitoring usage
Once a user successfully deploys a server to a particular operator, their control plane takes note of it and automatically spins up an instance. The operator can then view whatever server they are running and claim what has been accrued from their active jobs by clicking the track usage button on the operator page or by going here.
And that’s about it. Reach out to us on Discord for support, to report bugs and/or to suggest improvements.